Crown Jewels Basic Guide to Photographing Insulators
Reprinted from "Crown Jewels of the Wire", March 2004, page 25
Many readers have asked Crown Jewels for help in photographing insulators.
Collector Bill Ostrander has been one of our best advisors, so we asked him to
provide tips that will help you find success in photographing your insulators.
This is the setup used to take the photograph of the insulators used in the
examples. The light source is fluorescent bulbs with a color temperature of
about 5000K. The diffuser in the light cabinet is "sign white"
acrylic. You can position the insulator forward or back, or use black cards to
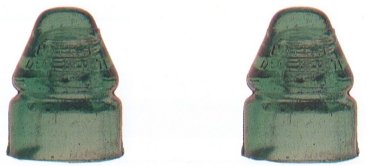
eliminate white "hot spots" on the sides of the insulator. Be careful
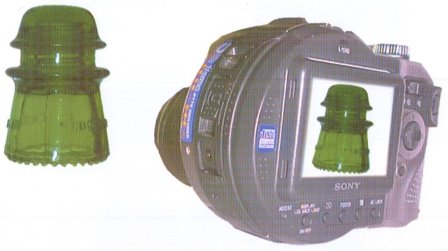
not to have other brightly colored insulators near your subject as in this
photo. Strong colors (photo below) can influence the color, and reflect off of
your subject insulator. Note the blue hue on the left side of the pinhole, and
the amber hue on the right side.
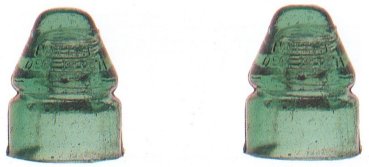
When photographing your insulators, it is best to use a telephoto lens and a
tripod. Back up and zoom in. If you are using a digital camera, use only the
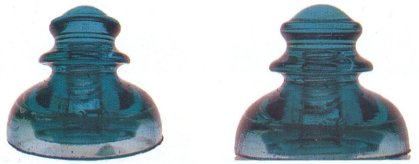
optical zoom. (Left Photo) This image was taken close up with a normal lens.
Notice the spherical distortion. (Right Photo) This image was taken from a
distance with a telephoto lens. It still fills the frame, but the shape looks
like the eye would see.
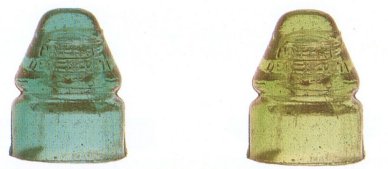
Here (Left Photo) is the raw image of a lime green CD 132 from a digital
camera (in this case, a Sony MVC-CD400, 4-megapixel.) The only modification has
been to crop and resize the image. Before taking the photos, I manually set the
white-balance on the camera to the lighted backdrop of the cabinet, and open up
the lens 1 stop (increase the exposure to "+ 1.0EV"). See the image at
the bottom of the page for how I determined the settings. (Right Photo) I
post-process all my insulator photographs. Here, using Paint Shop Pro version 7
(www.jasc.com). I sharpen the image.
(Left) Now I adjust the brightness by + 18 and the contrast by +23 to lighten
the image. (Right Photo) I use a little flood-fill to whiten the background, and
use white with the airbrush to eliminate the reflections in the glass shelf.
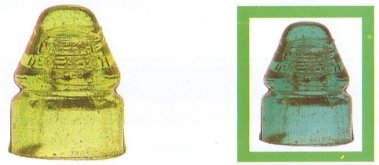
Now (Left) I compare the insulator to how it looks on the screen. In the
previous photo, it looked too green, so I adjust the hue +15. I find that with
this lighting, I usually have to adjust the hue somewhat. Although the previous
photos were more impressive, this looks just like the insulator I have in my
hand. (Right Photo) Of course, you can adjust the hue anywhere you want. Here it
is toward the olive side. A pretty insulator, but not the real thing!
(Left) You can also increase or decrease the color saturation to get the
image to match the insulator. In this case, I grossly increased the saturation.
Imagine what this fake photo would do on ebay!
(Right Photo) Be careful when
adding a border or other picture elements. Although it may be pretty, it can
change the perception of the insulator's color. Take a look at the demonstration
in the next image.
|
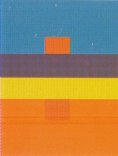 |
Believe it or not, the small color squares are exactly the same color. The
influence from the other background and border colors changes the eye's
perception of the color.
|

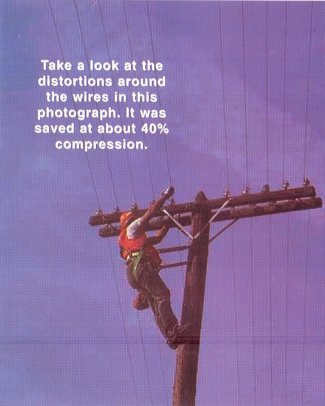
Now a word on JPEG compression. Most photographic images on the web are .jpg's.
You can usually set the compression level when you save the images. I like to
use minimal compression. Unfortunately, the less compression, the larger the
file size, BUT the better quality of the image. Take a look at these four
examples. From left to right, they are compressed 15%, 30%, 50% and 80%. The
file sizes are 16K, 10K, 7.6K and 4.2K. The type of image can determine how much
compression you can get away with. This is a somewhat "busy" image,
and the jpeg artifacts ("distortions") can hide in the image. For
images to be displayed on the web, keep in mind that the viewers may have a slow
internet connection speed, and might not wait around for a large-sized image to
download! If you are going to print the image, you will want to use minimal
compression.

For taking a photo of the whole insulator cabinet, I had to decrease the
exposure by closing the lens 0.7 stop ("-0.7EV" on the camera). The
nice thing about most digital cameras is that you can see how your exposure is
going to turn out while you make adjustment.
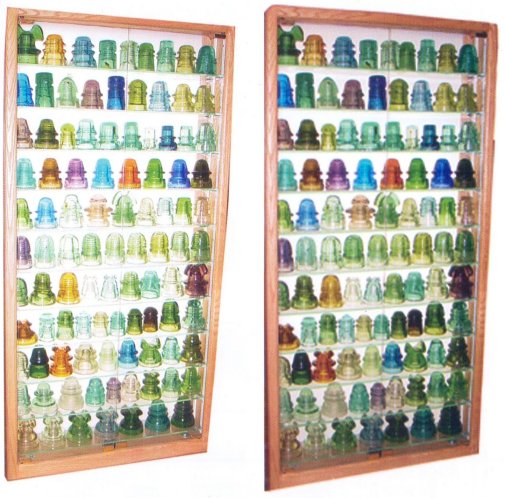
If you want to get the insulators in a lighted cabinet to show up and the
surrounding stuff, such as an insulator display at a show, set the camera up to
force the flash, even if it doesn't detect that one is needed. The left photo
shows the result. The right photo is also with a forced flash, but I had set the
exposure as in the cabinet photo on the previous page, then used the flash. That
way, the backlight of the cabinet is correct, and the flash fills in everything
else.
Editor's note: You can find more tips from Bill Ostrander at his website
shown on page B of this guide. Or, we can try to help you if you call. write or
email us at Crown Jewels. When you achieve success with colorful insulators,
share your pictures with us. We are always looking for insulators to feature as
"Insulator of the Month", or for photo layouts to use for color
inserts in Crown Jewels.
Howard & Linda Banks
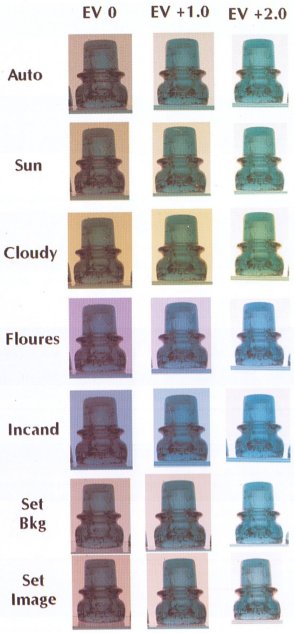
To determine how to set up my camera initially, I took a series of
photographs of an aqua insulator, using a combination of all the exposure values
I thought I would use, and the range of white balance settings the camera
offered. The titles on the left side of the chart are the color balance settings
on the camera.
Regarding the photography guide....
Bill Ostrander is an avid collector of both glass and porcelain insulators.
He been involved in the hobby for many years now; helped found the Jefferson
State Insulator Club; and served as the Club's first President. Bill has
numerous other interests, including sky diving, flying, geo-caching, antique
radios, musical instruments, cats, internet website development, and, of course,
photography.

Bill Ostrander
This month's eight-page colored insert featuring Bill's hints
for photographers can be purchased in pamphlet form for $2.00 apiece. Supplies
are limited, as only 100 were printed in pamphlet form. Order your Photography
Guide from Crown Jewels of the Wire, 1560 Hugo Road, Merlin, OR 97532.
Reference:
The color scheme shown on Page D of the Photography Guide is from the book,
"Interaction of Color", by Josef Albers, Copyright 1963, 1971 &
1975, Yale University. The out-of-print book is an excellent reference on color
for photographers, and can be purchased from used book sellers such as
Amazon.com
| 
)
)
)
)
)
)
)
)
)
)
)
)
)
)
)